

“Do…or do not. There is no try.”― Yoda, a long time ago, in a galaxy far, far away.
Observation: in trying not to do something, we will often do the thing we are trying not to do.
Wherein sage advice from a puppet is taken to heart and the 1979 Koga-Miyata MXA frame is given a fresh coat of paint. Twice.
The First Cut (Should Be Deeper)
Recently, I had the opportunity to borrow a vinyl cutter from Paul Wyganowski. My very positive experience painting the graphics on my SR Maxima using paint masks induced me to seize the learning opportunity that the vinyl cutter offered. Besides, fun toys!
The vinyl cutter was ostensibly marketed as “Windows-only” and the instructions for the vinyl cutter were…vague.
Except for gaming, I do not do Windows. On-line information for using the vinyl cutter with non-Windows operating systems was sparse, but I discovered that my vector drawing software, Inkscape, already had a driver to communicate with many makes of vinyl cutter, including the one I was borrowing.
I ran many tests with the pen insert to familiarize myself with the “printing” process. After nearly a full day in front of the computer, I was finally getting the hang of configuring the artwork in Inkscape and sending it to the vinyl cutter. But, I still had to run depth calibration tests with the self-adhesive vinyl sheet and the masking film I planned to use, as each was a different thickness. The cutting depth on two separate cutting heads was precisely set for their respective medium.
Now, I was confident the process was repeatable with the accuracy I wanted, so away we go…oops…

I learned very quickly that weeding and picking large patches from complex shapes was prone to lifting up bits of vinyl I wanted to keep in place. To make it easier to weed and pick, I added cut paths to break up complex shapes with many tiny points (like serif letters) into manageable pieces. And…hey presto, it worked!
As thanks for letting me borrow his vinyl cutter, I made several sets of different styles of vinyl decals for Paul Wyganowski to use on his frames and unicycles.
Thanks, Paul!
The Artwork
For the majority of decals used in this project, I would be using third-party-supplied decals.
My usual supplier of decals, SSS Ink, had Koga-Miyata decals available, but not quite the ones I wanted. I found these vinyl decals for the 1979 Koga-Miyata Pro Luxe, which were exactly the ones I wanted:

The remaining artwork was created in Inkscape and “printed” to the vinyl cutter as paint masks.
I selected a serif Hiragana (phonetic writing system) typeface for the “なりたい” glyphs that would be used on the fork blades, which supplant the “PROFESSIONAL” lettering from the set of vinyl decals. The Hiragana glyphs were cut into adhesive masking film to use as a paint mask, with transfer tape applied over the top to keep any “floating” elements in their correct locations (only the one: in each “な” or “na” glyph) until they were applied:

The paint masks for the owner name lettering were done using Tangerine pseudo-cursive typeface.
I had several “Dura-Ace EX” mylar decals, which were included with the new, old-stock parts I already had. One would be used.

I used my “happy bunny” custom dry transfer to denote that my hand had altered and renovated the frame. I added the years of fabrication (1979) and alteration/restoration/renovation (2026) using a serif typeface directly above and below, respectively.
All of the artwork was prepared with registration marks to make placement accurate and so easy to apply, even I could do it!
With the artwork ready, it was time to prepare the frame for paint.
Goudkoorts
As with any paint job, mistakes can happen, as I know all too well. This time, I did not try to not make any mistakes; I simply performed each task I set out to do, adapting and correcting as best I could.
Which color did I choose? The answer is exactly what I thought it would be. But also not at all. And yet, it was. Madness, I tell you, madness!
Inspired by Mr. Kvale’s Wall of Color™, I made color samples by painting sections of cut-off steel tubing. These were my color choices: Rich Gold pearl over white, Fools Gold candy over silver, and…surprise!…Daydreamer Blue metallic. Even now, I was playing around with the paint scheme and color choice. I decided to test the blue because it was similar to the original paint color. Would its beauty shake my resolve?
Daydreamer Blue was a slightly darker and richer blue than the original, which I favored, but it ended up being too metallic. How is that even possible? The silver flake was too saturated; I wanted a different effect for this bicycle.

Not seeing the irony, I was struck by gold fever and decided Fools Gold candy it is. An appropriate choice. Here’s the color sample I made:

But, I also used the Rich Gold pearl as an overlay, because you can never have too much gold, right? Here’s the over-all effect:

That’s a lot of gold! It’s very pretty, but it still wasn’t quite what I imagined. After all, an abundance of gold will not make you happy if it doesn’t speak to your soul. It was not orange, after all. What was I to do? Wasn’t it obvious?
The Mask
Setting aside the color choice, for now, I turned my attention to the head badge and chromed areas of the frame and fork.
The entire face of the head badge had been previously stripped to remove all of the paint from the gold-anodized aluminum. The sides of the head badge were lightly sanded to give more purchase to the primer and paint that would cover them.
All contaminants had to be removed from the frame, fork, and head badge. To degrease them, I wiped them down with a lint-free cloth and acetone to remove any residual oil, grease, and other contaminants. Once that dried, they were wiped down again with another lint-free cloth and some isopropanol.
Some areas of the frame and fork would not be painted and these needed to be masked to protect them from paint and primer.
At the last minute, I decided to paint the fork crown: the rough finish of the metal under the chrome was not to my liking.

The dropout and fork end faces were masked, as well as their narrow sides up to the point where they met the stays and fork blades, although I had my doubts about masking these.
A salvaged rear dérailleur pivot bolt was threaded into the rear dérailleur hanger to keep the threads free of over-spray and, more importantly, to give me another handle by which I could safely manipulate the frame while I painted.
Bolts were screwed into the water bottle bosses to keep paint out of the threads. Rubber covers were placed over the shift lever bosses. The polished tip of the pump peg was masked.
A mountain bike quill stem for 1-1/8″ steerers was secured into the seat tube. This would serve as another handle to manipulate the frame as I applied primer and paint.
It was time for primer!
The Primer
Another quick wipe-down made sure no contaminants had found there way onto the frame, fork, and head badge since masking. A tack cloth was used to keep them free of airborne particles.
Two wet coats of primer were applied to the unmasked areas of the frame, fork, and head badge, waiting 15 minutes between coats. The last coat was left to dry for two hours before I wet-sanded with 600-grit to smooth out the primer. A thorough wipe-down to remove sanding dust followed.
Spot coats of primer were sprayed over any areas that were sanded through to bare metal or uneven, repeating the drying, sanding, dusting process as before. Spot priming was repeated, where needed.

The head badge received two coats of primer, covering the outer edges to the vinyl mask.
A Foolish Choice
I decided to paint the frame Fools Gold candy with Rich Gold pearl overlay, although I still had doubts about the color.
The entire frame, fork, and frame pump body were sprayed with three coats of medium Silver metallic paint and left to dry for two hours. Then, the Fools Gold candy color-coat was sprayed over that. Surprisingly, only two coats were needed for full coverage, waiting 10 minutes between coats. The last coat was left to dry overnight.
The next day, the paint was looking good. Then, the first of three coats of Rich Gold pearl were sprayed on top and disaster struck. The paint sputtered from the spray gun in thick globs, the solvent carrier eating through the Fools Gold candy and the silver metallic paint underneath.
This was something I could repair with time and patience. After the paint had cured, careful sanding through to bare metal of the damaged areas was done. New primer, silver, Fools Gold candy, and Rich Gold pearl fixed the damage.
The fix required a lot of time and sanding, during which I reflected on my color choice and concluded that the gold color was not actually what I wanted.
Do I remain constant and be forever discontented with my color choice? Or, follow my heart?
The Heart (心)
“O, swear not by the moon, the fickle moon, the inconstant moon, that monthly changes in her circle orb, Lest that thy color choice prove likewise variable.” ― William Shakespeare, Romeo and Juliet
Fie! A pox on both my color choices! I changed my mind and decided on Sunburst (orange) pearl as my final color choice.
I am not one to fall prey to what is known as the sunk cost fallacy. All the time and labor and, especially, the mistakes made were another learning experience and an investment into becoming more familiar with my tools and, hopefully, an investment into becoming a better painter.
Most importantly, with this color choice my heart was happy.
Of course, I made another paint sample: Sunburst pearl over white:

The gold fever was finally broken.
Oranjegekte
Preparations
The head badge, frame, fork, and frame pump body were stripped down to bare metal, once again. The metal was roughened with 320-grit sandpaper to remove the last remnants of paint and primer, followed by a re-application of zinc-phosphate rust inhibitor to the frame and fork. This time, I also roughened the chrome-plating on the fork crown and fork blades, including the ends, so the primer would stick better to the chromed areas.
Spot putty was [re-]applied to pin-holes, scratches, gouges, and other rough areas; sanded smooth after curing. Zinc-phosphate rust inhibitor was then reapplied to these areas.
Vinyl masking was reapplied to the head badge.

The frame pump body was bare aluminum, so it was ready for primer right after sanding.

I reapplied the masking to the dropouts and fork ends, but only to the clamping faces. Having looked at the result of extensive masking with the Fools Gold candy, I did not like the effect (surprisingly) and decided to forego masking the chrome plating everywhere except the clamping faces. I left the water bottle bosses unmasked, as the clamping faces would be sanded bare before the clear-coat was applied.
Primer
Three coats of white primer evenly covered the head badge, frame, fork, and frame pump body. The primer was left to dry for two hours, then wet-sanded with 600-grit sanding sponge. A second coat of primer was applied, left to cure overnight.

The Frameset & Pump
The entire frame, fork, and frame pump body were sprayed with White paint over the white primer. Three light coats were needed for full coverage, waiting 20 minutes between coats. The last coat was left to dry for an hour as it was still a little cool in the unheated work space.
I managed two coats of Sunburst pearl before the spray gun started sputtering again, affecting the frame, fork, and pump body. I left the color coat to dry for an hour before wet-sanding the paint spatters down to the white coat, then lightly sanding the entire frame, fork, and pump body. It took five light coats of Sunburst pearl applied to the sanded areas until the color blended in with the rest of the paint. The spot color was left to dry for 20 minutes between coats, then blended in with the surrounding paint using the wet sanding sponge.

By this time, the air temperature was a perfect 30°C (85°F), so painting went quickly. Two final coats of Sunburst pearl were applied to the entire frame, fork, and frame pump body, waiting ten minutes between coats. The final coat was left to cure overnight.

The next morning, I noticed a few light spots on the stays, so applied some more Sunburst pearl, leaving everything to dry for two hours. Thankfully, the temperature was still warm enough to paint very early in the morning (7 a.m.). When that was dry, I lightly wet-sanded the frame, fork, and pump body to 1000-grit. A thorough wipe-down to remove sanding dust followed. Then, a very light sanding to 1200-grit and a wipe-down with a tack cloth to remove dust.
Back to the workbench…
The Head Badge
Between coating the frame, fork, and pump body, the head badge was spray-painted with black paint, needing only two lights coats, and left to dry while I worked on the frame before removing the vinyl masking.
While the final color coat on the frameset and pump body was curing, I could finish up the paint on the head badge. I went to my workbench and worked on the head badge on and off between painting the frameset.
For this very detailed hand-work, the head badge was secured to a small glass bottle with double-sided tape. A ring light with magnifier helped me to pick out details with a fine brush.
The circle around the “M” was hand-brushed with two coats of Snow White pearl paint, waiting ten minutes between coats.
The “M” was hand-brushed with two coats of Red paint, waiting ten minutes between coats.
The raised gear and all lettering were hand-brushed with two coats of Black paint.

Over-flow was carefully removed with a bamboo skewer sharpened on some sandpaper and a tiny piece of paper towel dabbed in isopropanol and held in tweezers.
I was not happy with the result, so I stripped the paint and reconsidered my head badge decorating options.
Protection
Later in the morning, the frame, fork, and frame pump body were degreased again in preparation for the first application of two-part clear-coat. Once mixed, the two-part clear-coat will cure within 24 hours.
Before clear-coat was applied, all masking was removed from the chromed areas, and the faces of the water bottle bosses were sanded free of paint, as these would also receive clear-coat.

The frame, fork, and frame pump body received three light coats of two-part clear, waiting 30 minutes between coats. This clear-coat is an intermediate coat on the frame and fork to protect the main color from damage should I err while applying the decorations. The frame, fork, and frame pump body were left to cure overnight.
The frame pump body was done, for now, and set aside.
The frame and fork were then wet-sanded to 1200-grit in preparation for placing the decorations.
The Decorations
The painted-on decorations were placed first using air-brushed and hand-applied paints.
The Frame
The owner name mask was applied to the non-drive-side chain stay on the oval section and sprayed with three coats of Black paint. The mask was removed immediately after spraying the last coat.

Every round cut-out on the fork blade tangs, the bottom of the lugs, and the edges of each cut-out in the bottom bracket shell was hand-filled with two coats of Red acrylic paint, waiting thirty minutes between coats.
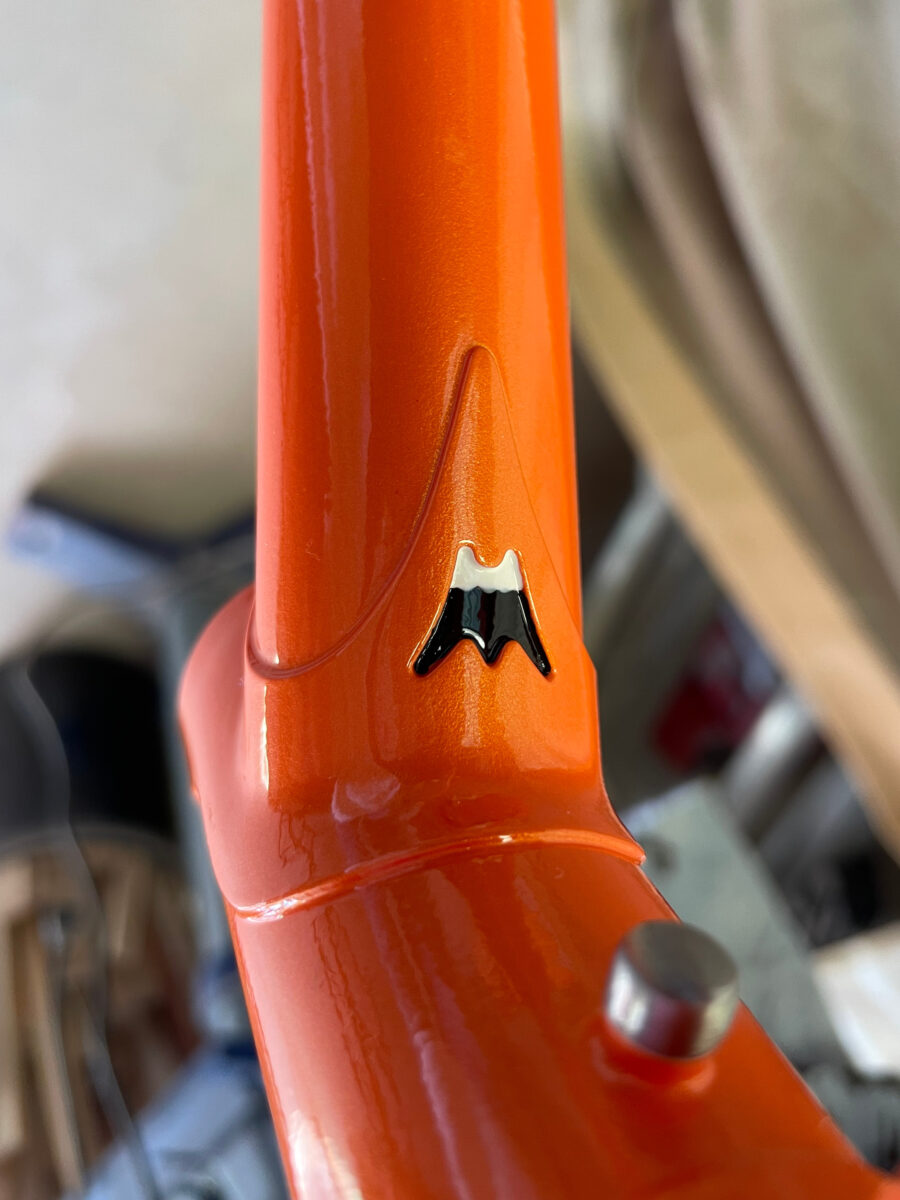
The “M” lug cutouts reminded me of Mount Fuji depicted on this manhole cover:

Every “M” cut-out in the top of each lug was hand-filled with two coats of Black acrylic paint, waiting ten minutes between coats. Once dry, the top two points of the “M” and about 1.5mm below were hand-filled with White acrylic paint.


The “M” cutouts were decorated this way as a fond reminder of Mount Fuji, which I had the pleasure of climbing in 2012 to watch the sun rise from the summit.

Back in the present, the Campagnolo bottom bracket inserts were placed into the frame and masking tape applied to the bottom bracket shell face. The frame was placed on the Bringheli frame alignment table, without clamping the bottom bracket shell. This would keep the painted shell faces from being marred. The locations for the remaining decorations were marked on strips of masking tape placed in previously determined positions.

Each decal was carefully applied to the frame.
The frame was getting very busy with all the decorations, and there was not much room on this smaller-sized frame for them all. I placed the “happy bunny” on the rear of the seat tube just above the bottom bracket shell to keep it “subtle”.

The Fork
Rather than masking the fork crown engravings precisely, I made three kistka-like paint applicators using 22-gauge hypodermic needles, the tips ground flat and polished so they would not bite into the existing paint. One for each color used: white, black, red.
The engraved circle around the “M” on each fork crown shoulder was hand-filled with White acrylic paint.
The “M” on each fork crown shoulder was hand-filled with Red acrylic paint.
The gear engraving on each fork crown shoulder was hand-filled with Black acrylic paint.
Only one coat of paint was needed for each color, but I put on two coats anyway. Before the paint dried, overflow was removed with isopropanol and a cotton pad held in tweezers. Acrylic paint was used because overflow could be removed without affecting the clear-coat.

The fork was placed in the Bringheli fork alignment fixture to mark the locations for the remaining fork decorations. Masking tape was placed along the outer face of each fork blade, placed and marked in previously determined positions for placement of the Tange tubing decals and the “なりたい” glyphs, reading from top to bottom.
The masks for the “なりたい” glyphs were applied to each fork blade and sprayed with three coats of Black paint. The masks were removed immediately after spraying the last coat.

At this point, I had stripped the head badge a couple of times and decided to paint the head badge to match the frame, mostly to cover up the marred gold anodizing and to make it a little easier when painting on the contrasting colors. I liked the way it turned out. A heavy clear-coat was applied to the head badge when it was dry.

The Finish
After a final degreasing, the entire frame and fork were given three wet coats of two-part clear, waiting 15 minutes between coats. This clear-coat was the top-coat to protect the decorative contrast colors and decals.
The frame, fork, and head badge were left to cure for a couple of days.
Then, frame, fork, and pump body were wet-sanded to 1200-grit to prepare for final polishing.
Using a combination wax and polishing compound, the frame, fork, pump body, and head badge were polished with a buffing wheel at low speed to a high gloss.

A prepared double-sided adhesive foam pad was applied to the back of the head badge. The head badge was applied to the head tube for the finishing touch.
The 1979 Koga-Miyata MXA frameset had been altered, restored, and renovated. It was ready to be transformed into a one-of-a-kind, once imaginary and soon-to-be-real 1984 Koga-Miyata Luxe bicycle.
The finish is far from perfect: uneven paint, evidence of the fixed blotches, misaligned and unevenly spaced decals. These imperfections were obvious only to the one who had put them there. The imperfections disappeared when seeing the completed frameset: my heart was happy with it, and I was happy with my progress in learning how to paint frames.
After nearly a week of being focused on painting, I was too exhausted to take formal photos, so that will have to wait until next time.
Afterward
“I am all anticipation…” ― Jane Austen, Pride and Prejudice
But, wait, there’s more…a few more things to do before the frameset is ready for photographs and Assembly Day. Please be patient, is what I tell myself.
Postscript
Do you have a treasured bicycle that needs repair, alteration, renovation, or restoration? Do you need or want a beautiful custom bicycle or replica? Well, you can contact this punny frame builder to do the work with great care and focus. But, you’ll have to put up with his puns, misquotes, and dad jokes.